Notice
Recent Posts
Recent Comments
Link
.Zzumbong
[DEV] react/typescript로 노노그램 만들어보기 본문
노노그램 토이프로젝트는 기획이나 정리 없이 머릿 속 순서대로 하고 있다!
정신 없이 흘러가기도 한다.
뭔가 퍼즐을 풀고 만드는 것을 좋아하다보니
평소에 노노그램을 폰으로 즐겨한다.
매번 취업을 위한 과제나 알고리즘을 풀다가 지쳐버린 나
내마음대로 만드는 것을 하고 싶어져서 노노그램 게임을 만들어보기로함!

1. 설치
npx create-react-app nonogram --template typescript
2. 절대경로 설정하기
{
  "compilerOptions": {
    "baseUrl": "src",
  },
  "include": ["src"]
}
3. sass 설치
npm install sass
4. reset.css 받기
/* box-sizing 규칙을 명시합니다. */
*,
*::before,
*::after {
  box-sizing: border-box;
}

/* 폰트 크기의 팽창을 방지합니다. */
html {
  -moz-text-size-adjust: none;
  -webkit-text-size-adjust: none;
  text-size-adjust: none;
}

/* 기본 여백을 제거하여 작성된 CSS를 더 잘 제어할 수 있습니다. */
body,
h1,
h2,
h3,
h4,
p,
figure,
blockquote,
dl,
dd {
  margin-block-end: 0;
}

/* list를 role값으로 갖는 ul, ol 요소의 기본 목록 스타일을 제거합니다. */
ul[role='list'],
ol[role='list'] {
  list-style: none;
}

/* 핵심 body의 기본값을 설정합니다. */
body {
  min-height: 100vh;
  line-height: 1.5;
}

/* 제목 요소와 상호작용하는 요소에 대해 line-height를 더 짧게 설정합니다. */
h1,
h2,
h3,
h4,
button,
input,
label {
  line-height: 1.1;
}

/* 제목에 대한 text-wrap을 balance로 설정합니다. */
h1,
h2,
h3,
h4 {
  text-wrap: balance;
}

/* 클래스가 없는 기본 a 태그 요소는 기본 스타일을 가져옵니다. */
a:not([class]) {
  text-decoration-skip-ink: auto;
  color: currentColor;
}

/* 이미지 관련 작업을 더 쉽게 합니다. */
img,
picture {
  max-width: 100%;
  display: block;
}

/* input 및 button 항목들이 글꼴을 상속하도록 합니다. */
input,
button,
textarea,
select {
  font: inherit;
}

/* 행 속성이 없는 textarea가 너무 작지 않도록 합니다. */
textarea:not([rows]) {
  min-height: 10em;
}

/* 고정된 모든 항목에는 여분의 스크롤 여백이 있어야 합니다. */
:target {
  scroll-margin-block: 5ex;
}
5. 폴더 정리 및 코드 정리

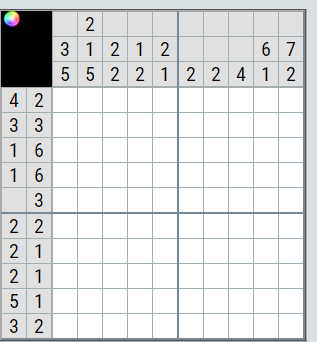
6. 본격전인 개발전에 10x10 기반에 노노그램 데이터를 만들어보자.


검색해보니까 완성본이 없어서 직접 풀어본다.. 예시 데이터로 좋을뜻!
데이터를 10x10 100개의 요소를 가진 2차원 배열로 만드는게 직관적이고 편해보인다.
const nonogram = [
  [1, 1, 1, 1, 0, 0, 0, 0, 1, 1],
  [1, 1, 1, 0, 0, 0, 0, 1, 1, 1],
  [1, 0, 0, 0, 1, 1, 1, 1, 1, 1],
  [0, 1, 0, 0, 1, 1, 1, 1, 1, 1],
  [0, 0, 0, 0, 0, 0, 0, 1, 1, 1],
  [1, 1, 0, 0, 0, 0, 0, 0, 1, 1],
  [1, 1, 0, 0, 0, 0, 0, 0, 0, 1],
  [1, 1, 0, 1, 0, 0, 0, 0, 0, 0],
  [1, 1, 1, 1, 1, 0, 0, 0, 0, 1],
  [1, 1, 1, 0, 0, 0, 0, 0, 1, 1],
];
얼핏보면 토끼가 보...인다
7. 반복해서 표현해보자
import './nonogram.scss';

const nonogram = [
  [1, 1, 1, 1, 0, 0, 0, 0, 1, 1],
  [1, 1, 1, 0, 0, 0, 0, 1, 1, 1],
  [1, 0, 0, 0, 1, 1, 1, 1, 1, 1],
  [0, 1, 0, 0, 1, 1, 1, 1, 1, 1],
  [0, 0, 0, 0, 0, 0, 0, 1, 1, 1],
  [1, 1, 0, 0, 0, 0, 0, 0, 1, 1],
  [1, 1, 0, 0, 0, 0, 0, 0, 0, 1],
  [1, 1, 0, 1, 0, 0, 0, 0, 0, 0],
  [1, 1, 1, 1, 1, 0, 0, 0, 0, 1],
  [1, 1, 1, 0, 0, 0, 0, 0, 1, 1],
];

function Nonogram() {
  return (
    <div>
      {nonogram.map((y, indexY) => {
        return (
          <div key={indexY} className="row">
            {y.map((x, indexX) => {
              return (
                <div
                  key={indexX}
                  className={`column ${x === 1 ? 'checked' : ''}`}></div>
              );
            })}
          </div>
        );
      })}
    </div>
  );
}

export default Nonogram;
.row {
display: flex;
}
.column {
display: flex;
border: 1px solid gray;
width: 25px;
height: 25px;
&.checked {
background: black;
}
}

그럴싸하게 나오는군!
갑자기 사용해본적 없는 styled-components를 사용해보고 싶어졌다. 해보자
부모에서 nonogram data를 props로 넘겨주고 styled-components 사용한다면 이렇게 된다.
npm install styled-components
//App.tsx
<Nonogram nonogram={nonogram} />


//Nonogram.tsx
import React from 'react';
import styled from 'styled-components';

interface ColumnProps {
  checked: boolean;
}

const Row = styled.div`
  display: flex;
`;

const Column = styled.div<ColumnProps>`
  display: flex;
  border: 1px solid gray;
  width: 25px;
  height: 25px;
  background: ${(props) => (props.checked ? 'black' : 'none')};
`;

type NonogramArray = number[][];

interface NonogramProps {
  nonogram: NonogramArray;
}

const Nonogram: React.FC<NonogramProps> = ({ nonogram }) => {
  return (
    <div>
      {nonogram.map((y, indexY) => (
        <Row key={indexY}>
          {y.map((x, indexX) => (
            <Column key={indexX} checked={x === 1} />
          ))}
        </Row>
      ))}
    </div>
  );
};

export default Nonogram;
다음 회차에는 게임 기본 기능을 만들어본다~
'Dev' 카테고리의 다른 글
| [DEV] react/typescript로 노노그램 만들어보기 - 2 (0) | 2024.03.24 |
|---|---|
| [DEV] 프론트엔드 개발자 포트폴리오 Intro 리뷰 (1) | 2024.03.20 |
| [TIP] 쉬운 디버깅을 위한 console 메소드 알아보기 (1) | 2024.02.15 |
| [15~22] 8년차 Front-End 개발자의 개발 인생 회고록 (1) | 2022.11.23 |
Comments


